개요 #
Morpheus Push는 스마트폰 OS에서 지원하는 PNS(Push Notification Server)를 기반으로 한 메시지 전송 플랫폼이다. iOS Client 에서는 UPMC WAS 에서 제공하는 Push API 를 각각 버전 규격에 맞춰 연동하여 원활하게 Push Service 를 운영하기 위한 라이브러리를 제공한다.
iOS개발 샘플은 https://total-msg-hub.github.io/pushiOS_sample/ 를 참조하시기 바랍니다.
용어 #
APNS
- Apple Push Notification Service 의 줄임말
- Apple 에서 직접 제공하는 영구적인 보안 채널에 공급자를 연결하여 대상 장치에 알림을 보낼 수 있는 서비스
UPMC
- Uracle Push Message Center 의 줄임말
- WAS(Web Application Server)에 배포되며, Apple APNS 서버와 TLS 인증으로 연결된 APNS Provider 서버를 Server 대 Server 로 연계하여 구동하는 서버 애플리케이션
- Receiver 라고도 불림
Service 등록
- APNS 로부터 Token 을 할당 받고 UPMC로 Push 서비스를 사용하겠다고 등록하는 절차
Service 해제
- UPMC 로 Push 서비스를 사용하지 않겠다고 등록을 삭제하는 절차
User 등록
- UPMC 로 Push 서비스에 대한 사용자를 등록 또는 변경하는 절차
ServiceAndUser 등록
- UPMC 로 Push 서비스 등록 및 사용자를 등록을 동시에 진행하는 절차
수신 확인
- 메세지를 제대로 받았을 때 UPMC로 ack를 주는 절차
읽음 확인
- App에서 메세지를 읽었을 때 UPMC로 ack를 주는 절차
Project ID
- Push 서비스 이용을 위해 Console에서 발급받은 ID
Client ID
- 사용자로 등록할 Client 의 고유한 ID (CUID 라고도 함)
- 제약은 없으며, 일반적으로 Email, User ID, Phone Number 또는 Device-UUID 등을 CUID 로 사용함
Client Name
- 사용자로 등록할 Client의 이름 (CNAME 라고도 함)
- 사용자의 이름이나 Nickname 또는 Device Name을 CNAME으로 사용
PSID
- Push Service ID 의 줄임말
- Push 서비스에 대한 고유 ID
- APNS에서 할당 받은 Device Token을 사용
APNS 인증키 p8 발급 따라하기 #
p8 키가 생성되어 있지 않을 경우 Apple 개발자 사이트에서 p8 Key 발급이 가능하다.
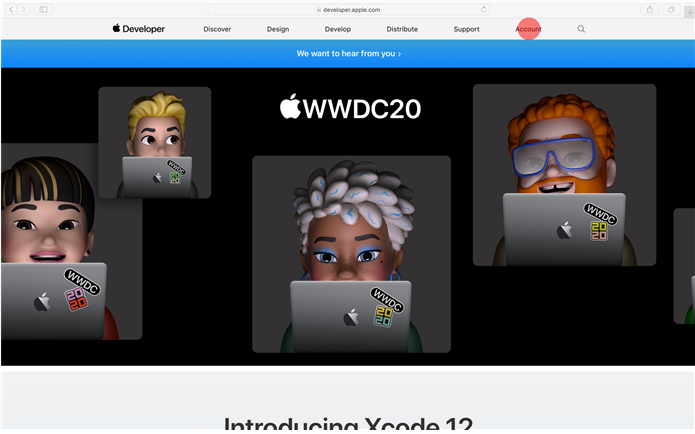
Apple 개발자 사이트 접속 #
- https://developer.apple.com 사이트로 이동한다.
- Account 메뉴를 눌러 로그인 화면으로 이동한다.
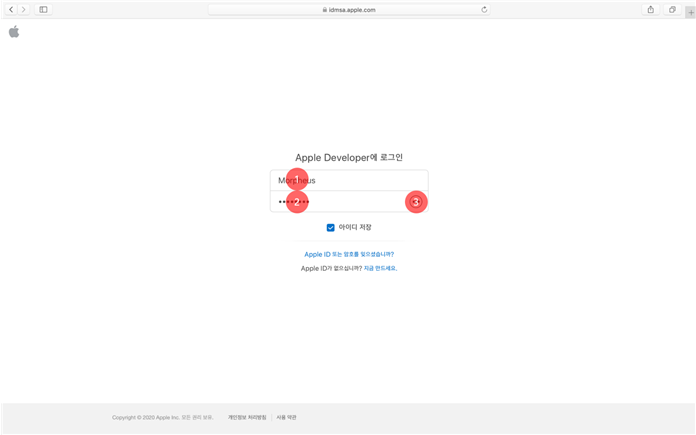
Apple Developer에 로그인 #
- 1번 항목에 애플 개발자 아이디, 2번 항목에 패스워드를 입력한다.
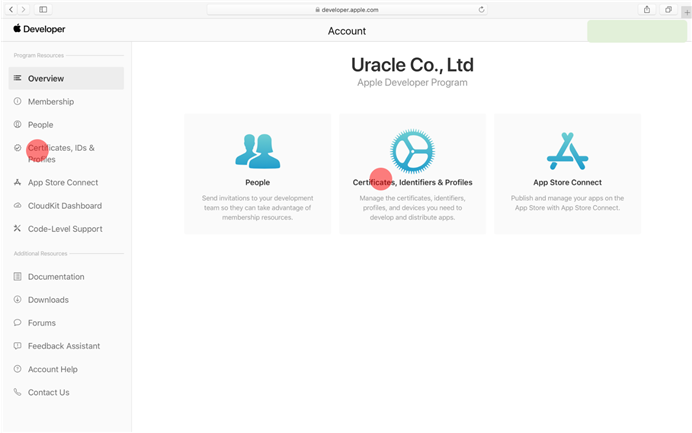
Account #
- Certificates, Identifiers & Profiles 메뉴로 이동한다.
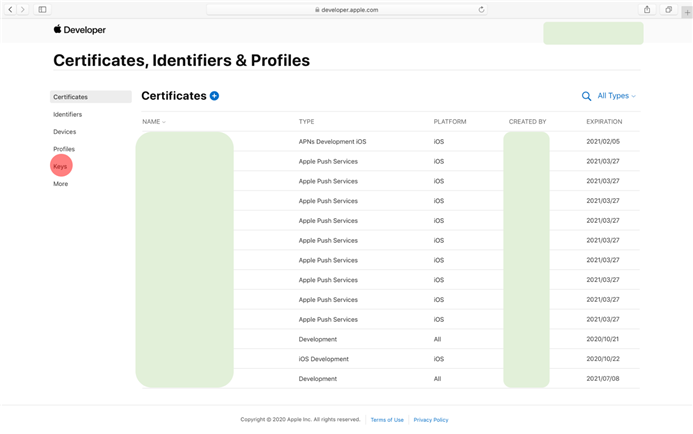
Certificates, Identifiers & Profiles #
- Keys 메뉴로 이동한다.
Keys #
- 1번 항목에서 기존에 생성되어 있던 p8키를 확인할 수 있다.
- p8키는 계정당 2개까지 생성이 가능하며 계정 내에 모든 앱이 함께 사용하는 부분으로 적절한 관리가 필요하다.

- 2번(+버튼)을 눌러 키를 추가한다.
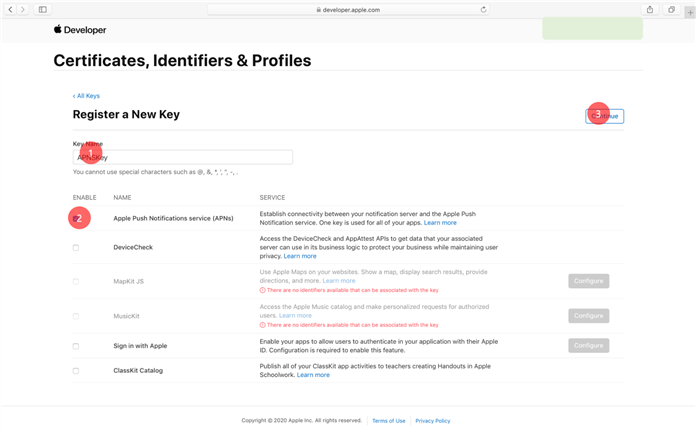
Register a New Key #
- 1번 항목에 Key 이름을 입력한다.
- 2번 항목을 체크하여 APNS Key를 선택한다.
- Continue를 눌러 다음 절차를 진행한다.
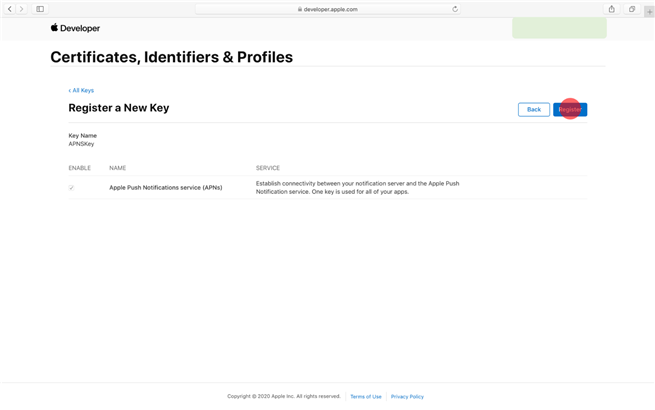
APNS Key 생성 중 #
- 선택한 설정에 대한 내용을 보여준다.
- Register를 눌러 키를 생성한다.
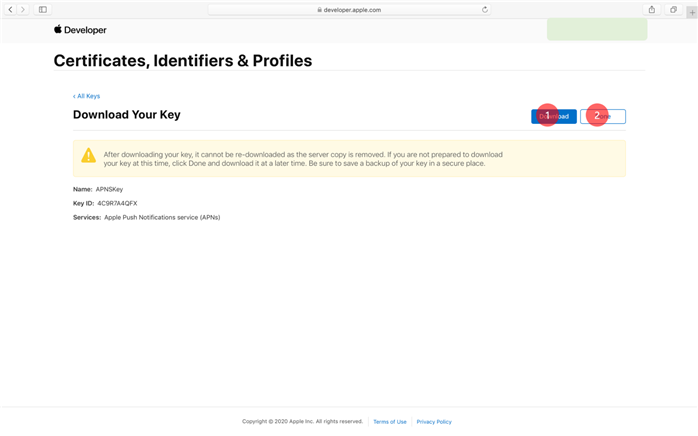
Download Your Key #
- Download 버튼을 눌러 p8키를 다운로드 받는다.
- p8키는 생성할때 1회 다운로드가 가능하고 이후 추가 다운로드가 불가하니 키 파일 관리에 유의해야 한다.
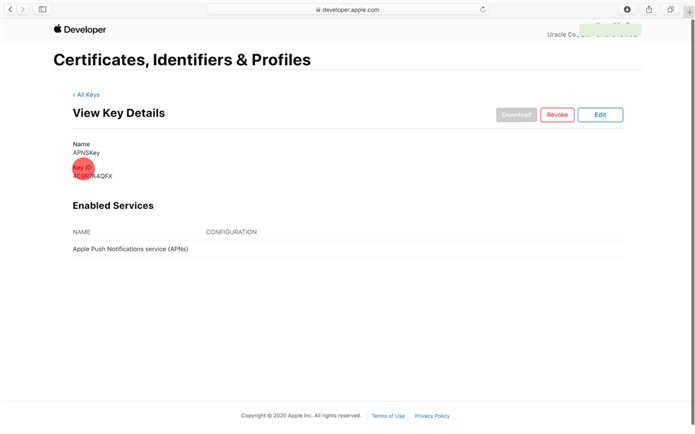
Key ID #
- Apple 개발자 사이트 -> Account -> Certificates, Identifiers & Profiles 메뉴로 이동한다.
- Keys 탭에서 기존에 생성되어 있는 Key 리스트와 그 Key ID를 확인할 수 있다.
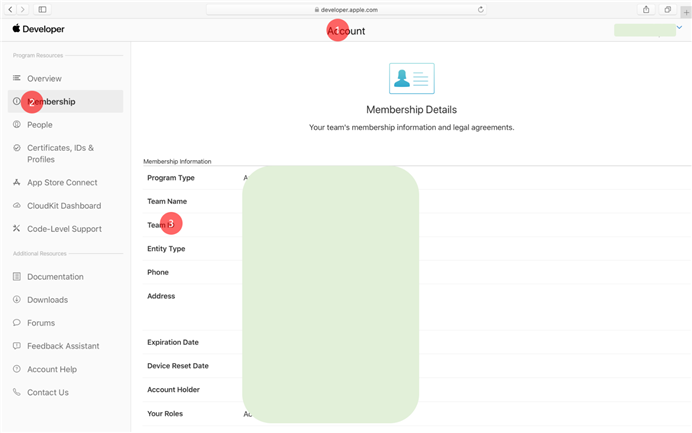
Team ID #
- 3.8. Download Your Key 을 통해, 획득한 p8 파일과 Key ID를 확인한다.
- Apple 개발자 사이트 -> Account -> Membership 에서 Team ID를 확인할 수 있다.
- 서비스 설정 시 위의 파일과 값을 사용한다.
SDK 및 설정 파일 #
SDK 파일 #
- iOS 용 SDK 파일
- MPushLibrary.framework : APNS Push를 활용할 수 있는 라이브러리가 담긴 framework 파일
- MPushLibrary.bundle : MPushLibrary.framework 을 사용함에 있어 필요한 resource가 담긴 bundle 파일
- iOS 용 샘플 파일
- PushRecevier : PushManagerDelegate 대리자 샘플 파일
- 관련 Frameworks 추가
- XCode Project 설정 > Build Phases > Link Binary With Libraries > UserNotifications.framework 추가
- iOS10 대응을 위해 추가되는 UserNotifications.framework 을 추가하기 위해서는 XCode 8 이상 필요
공통 설정 파일 #
- Manifest.xml : Push 구동을 위한 설정 파일
<manifest useDirectView="false">
        ...
    <settings>
        <push>
            <receiver>
                <log>y</log>
                <version>x.x</version>
                <server>https://upmc.msghub.uplus.co.kr/upmc</server>
                <app-id>xxxxxxxxxxxxxxxxxxxxxxx</app-id>
            </receiver>
        </push>
    </settings>
    ...
</manifest>- settings.push.receiver 에 대한 설정값
| Key | Type | Description |
| app-id | String | MsgHub console에서 생성한 앱 식별자 |
| log | String | Push Service 에 대한 Debugging 로그 출력 여부 ( y / n ) |
| version | String | UPMC Version (5.0 – 고정값) |
| server | String | UPMC WAS 서버 URL (고정 값) |
프로젝트 생성 따라하기 #
iOS 프로젝트를 생성한다. Xcode11.3 버전을 기준으로 작성됨
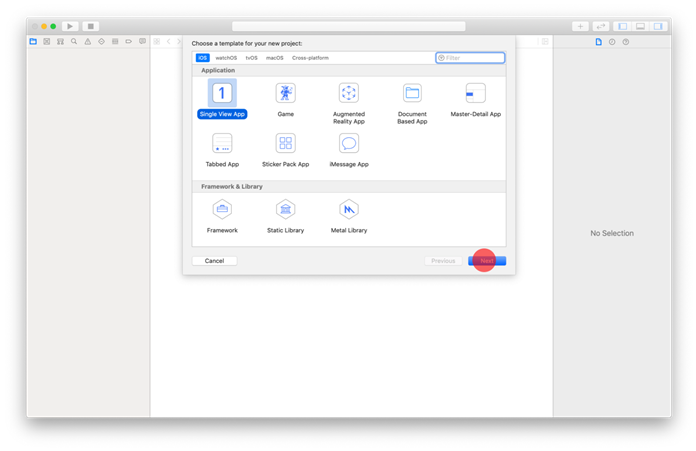
Create a new Xcode project #
- 템플릿 어플리케이션을 선택하고 Next를 눌러 다음 절차를 진행한다.
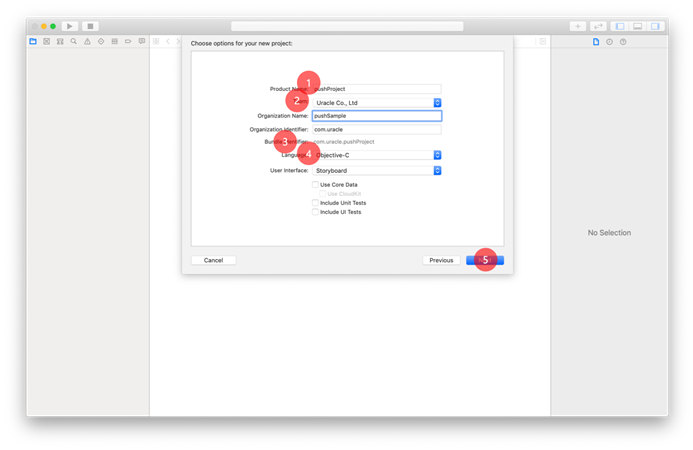
새 프로젝트 설정 #
- 설정 항목들은 앱을 생성후 변경이 가능하다.
- 1번 항목에 프로젝트 이름을 입력한다.
- 2번 항목은 Apple Developer Team을 선택하는 부분으로 연동된 개발자 계정이 없을 경우 None으로 설정된다.
- 3번 항목은 앱의 고유한 아이디 값으로 앱을 구별하는 기준이 된다.
- Objective-C를 기준으로 적용방법이 가이드
- Next를 눌러 다음 절차를 진행한다.
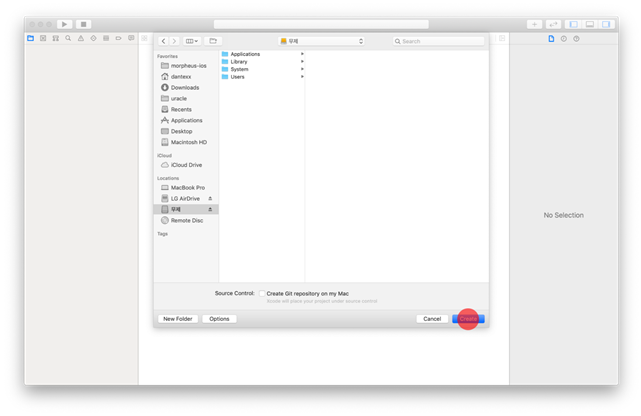
프로젝트 생성 경로 설정 #
- 프로젝트가 생성될 위치를 선택하고 프로젝트를 생성한다.
프로젝트에 Push SDK 적용 #
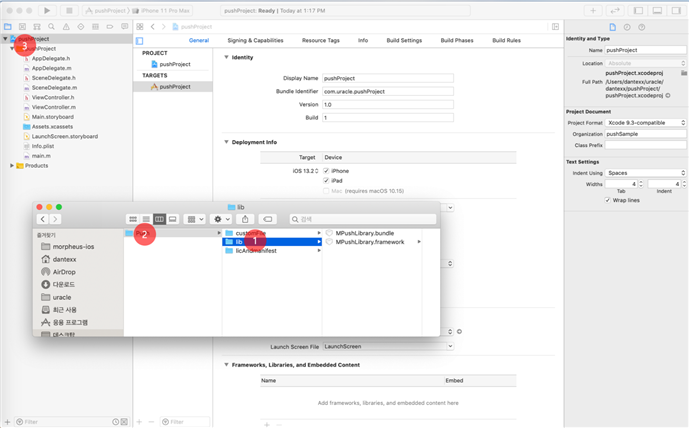
Push SDK 프로젝트에 drag & drop #
- 1번 항목에서 라이브러리 파일 MPushLibrary.framework 와 MPushLibrary.bundle을 확인할 수 있다.
- Custom 파일과 Manifest.xml 파일이 포함된 2번 폴더 전체를 프로젝트에 드래그하여 추가한다.
- Custom 파일은 사용방법에 따라 추가하지 않을수 있으며 라이브러리와 Manifest.xml 은 반드시 포함되어야 한다.
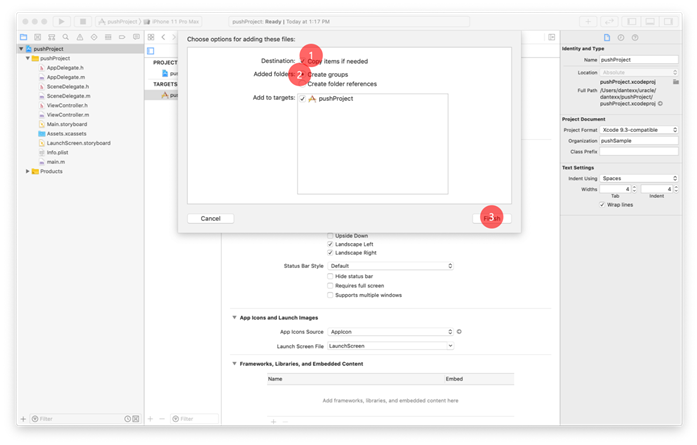
Push SDK 프로젝트에 추가(옵션) #
- 1번 항목이 체크되어 있으면 프로젝트 폴더에 드래그한 파일이 복사된다.
- Create groups 옵션이 선택되어 있는지 확인한다.
- Finish를 선택하여 SDK 추가
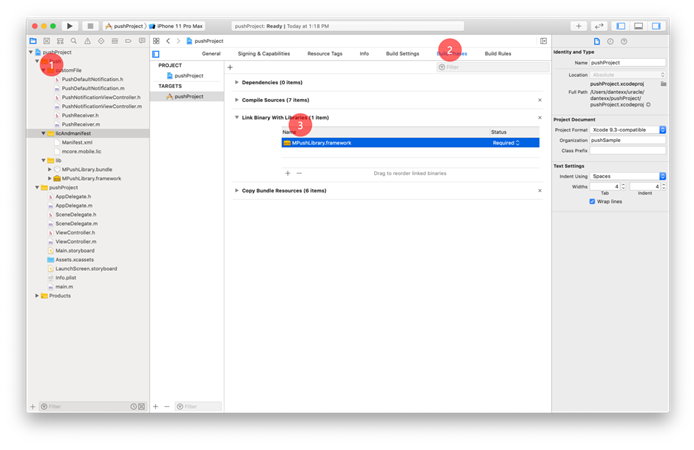
Push SDK 프로젝트에 추가 (완료) #
- 1번 항목에서 SDK가 추가된 것을 확인할 수 있다.
- Target -> Build Phases -> Link Binary With Libraries 항목에서 추가된 framework를 확인할 수 있다.
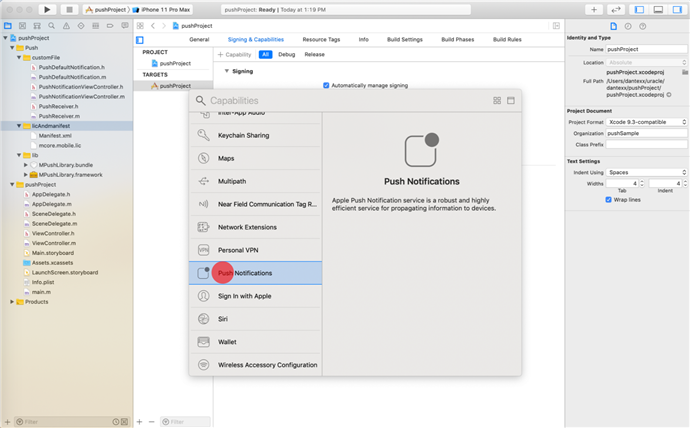
프로젝트 Push 설정 #
- iOS Push를 사용하기 위해서는 Capabilities 항목에 Push Notifications를 추가해 주어야 한다.
- Target -> Signing & Capabilities 메뉴에서 + Capabilities 항목을 선택한다.
프로젝트 Push 설정(Capabilities) #
- 팝업에서 Push Notifications 항목을 선택한다.
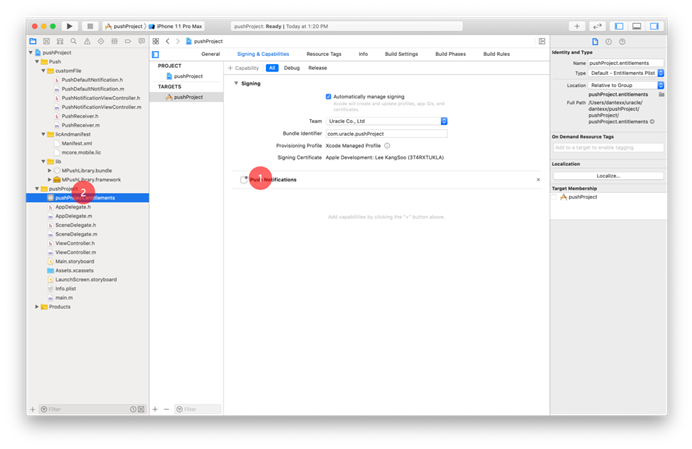
프로젝트 Push 설정(완료) #
- Push Notifications 항목이 추가된 것을 확인할 수 있다.
- 프로젝트이름.entitlements 파일이 추가된 것을 확인할 수 있다.
Push 라이브러리 초기화 #
- 일반적으로 Appdelegate.m 파일에서 Push 라이브러리를 초기화한다.
Case #1. <MPushLibrary/AppDelegate+PushManager.h>로 바로 연동
#import <MPushLibrary/PushManager.h>
// (optional) PushManagerDelegate 대리자를 설정할 경우
#import "PushReceiver.h"

- (BOOL)application:(UIApplication *)application
                didFinishLaunchingWithOptions:(NSDictionary *)launchOptions {

    ...

    [[PushManager defaultManager] application:application
                                        didFinishLaunchingWithOptions:launchOptions];

    // (optional) PushManagerDelegate 대리자를 설정할 경우
    [[PushManager defaultManager] initilaizeWithDelegate:[[PushReceiver alloc] init]];

    return YES;
}
Case #2. Push Notification 관련 UIApplicationDelegate 를 직접 연동하여 처리할 경우
#import <MPushLibrary/PushManager.h>
// (optional) PushManagerDelegate 대리자를 설정할 경우
#import "PushReceiver.h"

- (BOOL)application:(UIApplication *)application
                didFinishLaunchingWithOptions:(NSDictionary *)launchOptions {

    ...

    [[PushManager defaultManager] application:application
                        didFinishLaunchingWithOptions:launchOptions];

    // (optional) PushManagerDelegate 대리자를 설정할 경우
    [[PushManager defaultManager] initilaizeWithDelegate:[[PushReceiver alloc] init]];

    return YES;
}

- (void)application:(UIApplication *)application
                didRegisterForRemoteNotificationsWithDeviceToken:(NSData *)deviceToken {

    [[PushManager defaultManager] application:application
                            didRegisterForRemoteNotificationsWithDeviceToken:deviceToken];
}

- (void)application:(UIApplication *)application
                didFailToRegisterForRemoteNotificationsWithError:(NSError *)error {

    [[PushManager defaultManager] application:application
                            didFailToRegisterForRemoteNotificationsWithError:error];
}

- (void)application:(UIApplication *)application
                didReceiveLocalNotification:(UILocalNotification *)notification {

    [[PushManager defaultManager] application:application
                            didReceiveLocalNotification:notification];
}

- (void)application:(UIApplication *)application
                didReceiveRemoteNotification:(NSDictionary *)userInfo {

    [[PushManager defaultManager] application:application
                            didReceiveRemoteNotification:userInfo];
}

/*
 // Background 모드에서 호출하는 경우에 사용
- (void)application:(UIApplication *)application
        didReceiveRemoteNotification:(NSDictionary *)userInfo
        fetchCompletionHandler:(void (^)(UIBackgroundFetchResult))completionHandler {

        [[PushManager defaultManager] application:application
                didReceiveRemoteNotification:userInfo
                fetchCompletionHandler:completionHandler];
}
*/

- (void)application:(UIApplication *)application
   didRegisterUserNotificationSettings:(UIUserNotificationSettings *)notificationSettings {

    [[PushManager defaultManager] application:application
                didRegisterUserNotificationSettings:notificationSettings];
}
프로젝트 빌드 #
- APNS 테스트의 경우 Simulator에서는 APNS TOKEN값이 발급되지 않아 테스트가 불가하다.
- iOS 디바이스 빌드를 위해서는 애플 아이디, 인증서, 프로비저닝 프로파일 등이 필요하다.
- 코드 서명 https://developer.apple.com/kr/support/code-signing
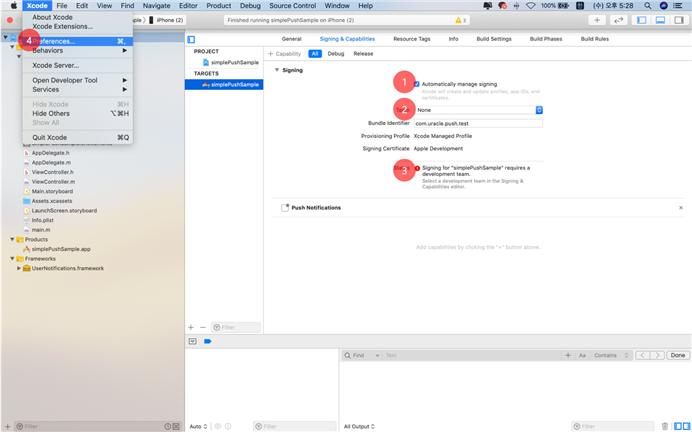
빌드 준비 #
- 1번: 인증서, 프로비저닝 프로파일을 수동으로 셋팅할지 자동으로 셋팅할지 여부를 체크
- 2번: Team을 선택하기 위해서는 Preferences 메뉴에 Apple ID가 등록되어 있어야 한다.
- 3번: 빌드를 위한 셋팅 중 오류가 발생하면 관련 오류 메시지가 표기된다.
- 4번: Xcode -> Preferences 메뉴를 선택하여 Apple ID를 추가한다.
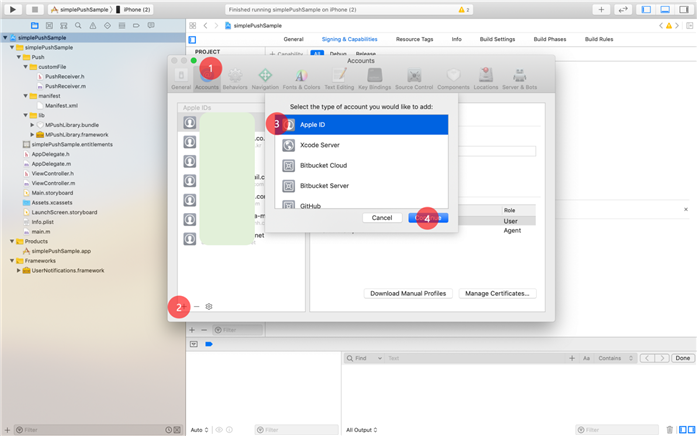
Apple ID 연동 #
- 애플 개발자사이트에 등록되어 있는 Apple ID를 XCode와 연동하는 과정이다.
- 1번: Accounts메뉴를 선택하면 등록되어 있는 계정 등의 정보 확인이 가능하다.
- 2번 +버튼을 누르고 3번 Apple ID를 선택한다.
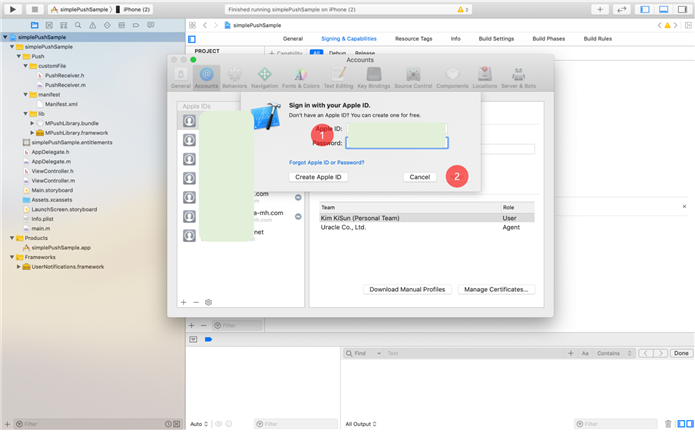
Apple ID 연동 (계정 입력) #
- Apple ID 와 Password를 입력하고 Next를 눌러 계정을 추가한다.
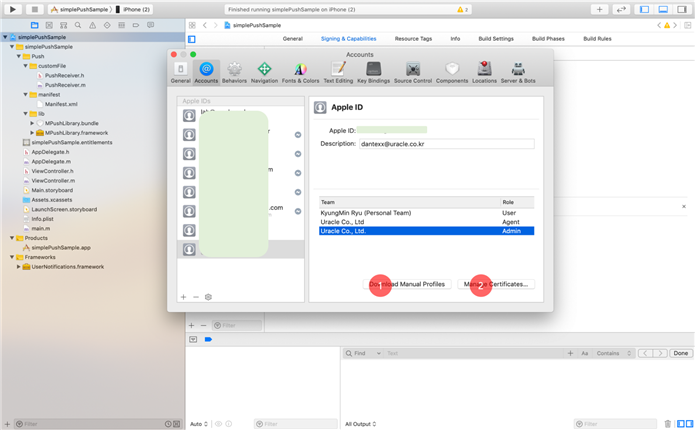
Apple ID 연동 (완료) #
- 1번: 선택된 계정에 생성되어 있는 프로비저닝 프로파일을 다운로드한다.
- 2번: 선택된 계정에 인증서를 생성 편집 등을 할 수 있는 편집 창을 띄운다.
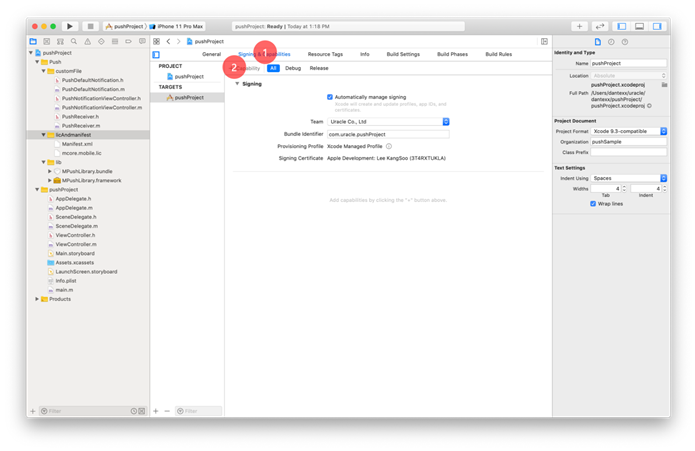
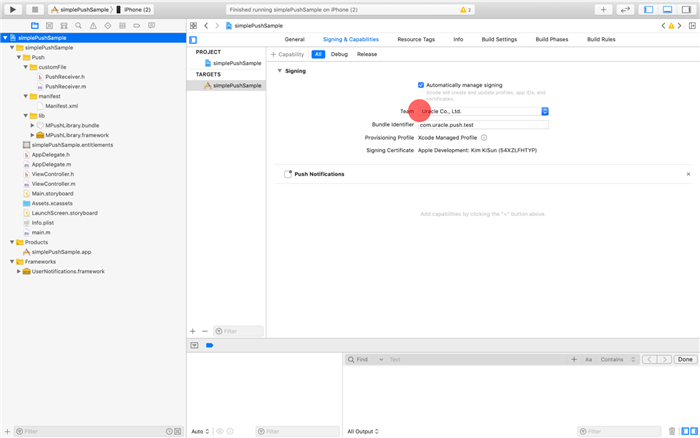
Automatically Manage signing #
- 등록되어 있는 Apple ID를 기준으로 Team을 선택할 수 있다.
- 빌드 셋팅 관련 오류 메시지가 사라지면 정상적으로 연결된 단말기에 빌드할 수 있다.
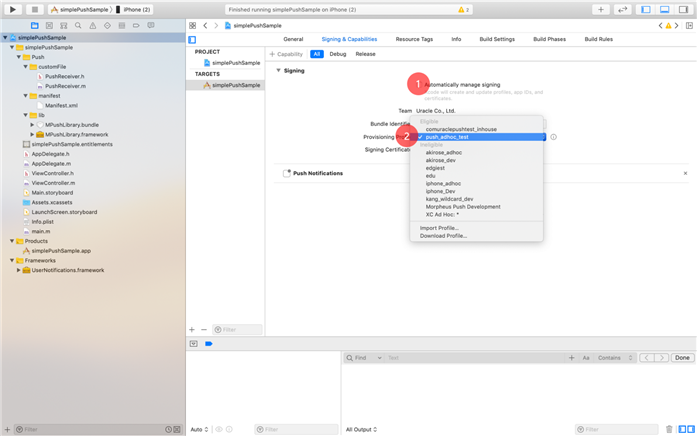
Manually Manage signing #
- Automatically Manage signing을 해제하면 맥에 설치되어 있는 인증서, 프로비저닝 프로파일 기준으로 설정할 수 있다
- Provisioning Profile 에서 설치된 프로비저닝 프로파일을 선택할 수 있다.
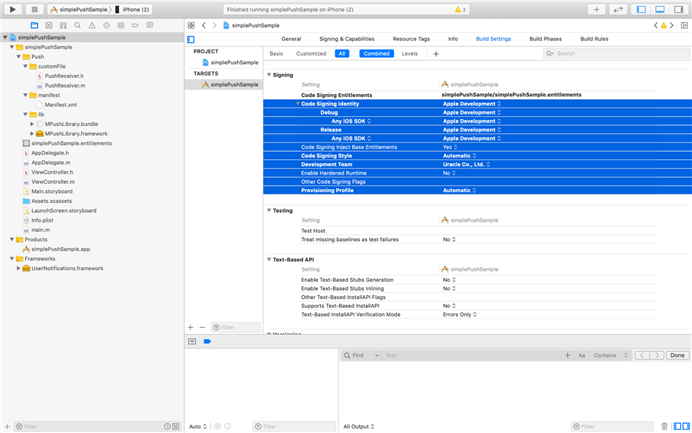
Signing 메뉴 #
- 프로젝트 -> Target -> Build Settings에서 Signing 메뉴에서 signing에 대한 설정을 할 수 있다.
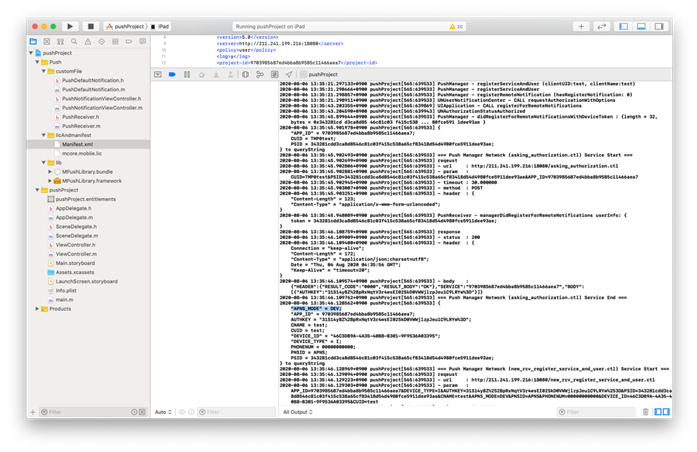
로그 보기 #
- 코드 서명이 정상적으로 준비가 되면 연결된 Target Device를 선택한다.
- run 버튼을 누르면 하단 창이 활상화되고 하단 창이 열리지 않을 경우 3번 버튼을 클릭하여 활성화할 수 있다.
- 하단 창의 로그가 보이지 않을 경우 4번이 비활성화 되어 있는지 확인
- Manifest.xml 파일에서 log가 y로 되어 있을 경우에만 Push 관련 로그가 표기
- Push 라이브러리가 정상적으로 초기화가 되면 화면과 같은 로그를 확인할 수 있다.

APNS_MODE #
- APNS_MODE는 서버에서 메시지 발송 시 APNS서버를 TEST로 발송할지 REAL로 발송할지에 대한 여부 값이 된다.
- APNS_MODE값이 일치하지 않을 경우 메시지 발송 시 Bad Device Token오류가 발생한다.
- RegisterServiceAndUser API호출시 서버에 해당 값을 전달한다.
- Push 라이브러리 초기화 시 값이 설정되며 default 값은 REAL
- (5.0.4 버전 이상 시 mobile provision 값을 체크하여 라이브러리에서 자동으로 초기화)
- 개발용 인증서로 앱을 빌드 시 APNS TOKEN값은 TEST토큰값이므로 DEV설정 필요하다.
- [[PushManager defaultManager].info changeMode:@”DEV”];
Push Service 연동 #
Push Notification 관련 UIApplicationDelegate 를 직접 연동하는 경우
#import <MPushLibrary/PushManager.h>

- (BOOL)application:(UIApplication *)application
                didFinishLaunchingWithOptions:(NSDictionary *)launchOptions {

    ...

    [[PushManager defaultManager] application:application
                        didFinishLaunchingWithOptions:launchOptions];

    return YES;
}

- (void)application:(UIApplication *)application
                didRegisterForRemoteNotificationsWithDeviceToken:(NSData *)deviceToken {

    [[PushManager defaultManager] application:application
                            didRegisterForRemoteNotificationsWithDeviceToken:deviceToken];
}

- (void)application:(UIApplication *)application
                didFailToRegisterForRemoteNotificationsWithError:(NSError *)error {

    [[PushManager defaultManager] application:application
                            didFailToRegisterForRemoteNotificationsWithError:error];
}

- (void)application:(UIApplication *)application
                didReceiveLocalNotification:(UILocalNotification *)notification {

    [[PushManager defaultManager] application:application
                            didReceiveLocalNotification:notification];
}

- (void)application:(UIApplication *)application
                didReceiveRemoteNotification:(NSDictionary *)userInfo {

    [[PushManager defaultManager] application:application
                            didReceiveRemoteNotification:userInfo];
}

/*
 // Background 모드에서 호출하는 경우에 사용
- (void)application:(UIApplication *)application
        didReceiveRemoteNotification:(NSDictionary *)userInfo
        fetchCompletionHandler:(void (^)(UIBackgroundFetchResult))completionHandler {

        [[PushManager defaultManager] application:application
                didReceiveRemoteNotification:userInfo
                fetchCompletionHandler:completionHandler];
}
*/

- (void)application:(UIApplication *)application
   didRegisterUserNotificationSettings:(UIUserNotificationSettings *)notificationSettings {

    [[PushManager defaultManager] application:application
                didRegisterUserNotificationSettings:notificationSettings];
}
<MPushLibrary/AppDelegate+PushManager.h> 로 바로 연동하는 경우
#import <MPushLibrary/PushManager.h>
#import <MPushLibrary/AppDelegate+PushManager.h>

- (BOOL)application:(UIApplication *)application
                didFinishLaunchingWithOptions:(NSDictionary *)launchOptions {

    ...

    [[PushManager defaultManager] application:application
                                        didFinishLaunchingWithOptions:launchOptions];

    return YES;
}
Push APIs #
Initialize with delegate
[[PushManager defaultManager] initializeWithDelegate:delegate];- Push Manager 를 시작하면서 delegate(대리자) 을 등록
- 등록된 delegate 을 통해 message 수신 등 push 와 관련된 business logic controller 역할을 대행
- delegate 이 등록되지 않으면 앱이 시작되면서 전달받은 push message 들은 자동으로 지연 전달됨
Parameters
- delegate (id<PushManagerDelegate>) – delegate 값, NotNull
Register Service and User
[[PushManager defaultManager] registerServiceAndUser:activity, clientUID:@"CUID" clientName:@"CNAME" completionHandler:^(BOOL success) {}];- Client ID와 Client Name으로 서비스 등록 및 사용자 등록을 진행
Parameters
- activity (UIViewController) – 호출하는 화면 전달, NotNull
- clientUID (NSString) – Client ID 값, NotNull, (사용가능 문자 : 알파벳, 숫자)
- clientName (NSString) – Client Name 값, NotNull
- completionHandler (BlockHandler) – User 등록 완료 후 호출, Nullable
Unregister Service
[[PushManager defaultManager] unregisterService:activity completionHandler:^(BOOL success) {}];- 서비스 해제
Parameters
- activity (UIViewController) – 호출하는 화면 전달, NotNull
- completionHandler (BlockHandler) – Service 해제 완료 후 호출, Nullable
Read Message
[[PushManager defaultManager] read:activity notification:userInfo completionHandler:^(BOOL success) {}];- 읽음 확인 정보를 서버에 전송
- didReceiveRemoteNotification: 로 전달된 userInfo 를 그대로 전달
Parameters
- activity (UIViewController) – 호출하는 화면 전달, NotNull
- userInfo (NSDictionary) – 수신된 Notification 데이타, NotNull
- completionHandler (BlockHandler) – Service 해제 완료 후 호출, Nullable
[[PushManager defaultManager]
        read:activity notification:userInfo
        badgeOption:PushManagerBadgeOptionKeep
        completionHandler:^(BOOL success) {

}];
PushManager Delegate #
PushStatus #
- Push Message 가 발송된 상태값
| Constant | Description |
| START | Push Message 로 앱을 시작한 경우 |
| ACTIVE | Application Forground Status 에서 Push Message 를 받은 경우 |
| BACKGROUND | Application Background Status 에서 Push Message 가 전달된 경우 |
Delegate 설정 #
- Push Message 수신을 대행하는 대리자를 등록
- (void)initilaizeWithDelegate:(id <PushManagerDelegate>)delegate {}- 서비스 해제
Parameters
- delegate (PushManagerDelegate) – PushManager 의 역할을 대행할 대리자 등록
[[PushManager defaultManager] initializeWithDelegate:self];Push Message 수신 처리 #
- (void)manager:(PushManager *)manager didReceiveUserNotification:(NSDictionary *)userInfo


status:(NSString *)status messageUID:(NSString *)messageUID {}- 서비스 해제
Parameters
- manager (PushManager) – PushManager Instance, NotNull
- userInfo (NSDictionary) – 수신된 Notification 데이타, NotNull
- status (PushStatus) – 수신된 Notification 의 상태, NotNull
- messageUUID (NSString) – 앱에서 부여한 수신된 메세지의 고유 ID, NotNull
- (void)manager:(PushManager *)manager didReceiveUserNotification:(NSDictionary *)userInfo status:(NSString *)status messageUID:(NSString *)messageUID {

        PushManager *manager = [PushManager defaultManager];

        NSDictionary *apsInfo = [userInfo objectForKey:@"aps"];

        // 읽음 확인
        [manager read:self notification:notification.userInfo completionHandler:^(BOOL success) {
                NSString *message = ( ! success ) ? @"Confirming Read-Message is FAIL !!" : @"Confirming Read-Message is SUCCESS !!";
                NSLog( @"%@", message );
        }];

        // 알림 메세지
        NSString *title = [NSString stringWithFormat:@"PUSH (%@)", status];
        NSString *message = [apsInfo objectForKey:@"alert"];

        if ( NSClassFromString(@"UIAlertController") ) {
                UIAlertController *alert = [UIAlertController alertControllerWithTitle:title message:message preferredStyle:UIAlertControllerStyleAlert];

                [alert addAction:[UIAlertAction actionWithTitle:@"취소" style:UIAlertActionStyleCancel handler:^(UIAlertAction *action) {

                }]];

                [alert addAction:[UIAlertAction actionWithTitle:@"확인" style:UIAlertActionStyleDefault handler:^(UIAlertAction * _Nonnull action) {

                }]];

                UIViewController *viewController = [[UIApplication sharedApplication] keyWindow].rootViewController;

                if ( viewController.presentedViewController ) {
                        viewController = viewController.presentedViewController;
                }

                [viewController presentViewController:alert animated:YES completion:^{

                }];
        }
        else {
                UIAlertView *alert = [[UIAlertView alloc] initWithTitle:title message:message delegate:nil cancelButtonTitle:@"취소" otherButtonTitles:@"확인", nil];

                [alert show];
        }
}
Push Payload #
Payload 항목 #
- JSONObject key 값에 대한 설명 [key가 소문자임]
| Key | 활용방법 |
| alert | 푸시 메시지 제목(옵션)과 메시지 내용이 JSON 형식으로 전달됨 |
| ext | 푸시 메시지 외에 추가적인 세부 정보를 전달 |
| pushkey | public push의 토큰 유효성을 위해 관리되는 키 (서버관점) |
| seqno | Push message의 고유 키값 |
| appid | Push 서비스가 관리되는 앱 ID ( Application ID) |
| sender | 발송자 코드 (서버관점) |
| senddate | 발송된 시간 (서버관점) |
Payload 예시 #
- 일반(text) push 메시지 예시
{
   "aps":{
      "badge":"0",
      "sound":"alert.aif",
      "alert":"{\"title\":\"메시지 테스트\",\"body\":\"일반 메시지 테스트입니다.\"}"
   },
   "mps":{
      "appid":"LGU-SAMPLEAPP-00001",
      "ext":"{}",
      "seqno":"LtFCtmX1PI.6cJtPW",
      "sender":"LGUR_cm-push-provider-ad-1_AD|E",
      "senddate":"2022-06-13 09:52:28",
      "db_in":"N",
      "pushkey":"2427efdf1b62cd9dbdf174bbdff048f8051461e1"
   }
}- 이미지 push 메시지 예시
{
   "aps":{
      "badge":"17",
      "sound":"alert.aif",
      "alert":"{\"title\":\"이미지 테스트\",\"body\":\"이미지를 포함한 메시지 테스트입니다.\"}"
   },
   "mps":{
      "appid":" LGU-SAMPLEAPP-00001",
      "ext":"{\"imageUrl\":\"https:\/\/df25hb5tuwkue.cloudfront.net\/push\/abc"}",
      "seqno":"4YslPTW9Lv.6cJtPY",
      "sender":" LGUR_cm-push-provider-ad-1_AD|E ",
      "senddate":"2022-06-13 09:54:01",
      "db_in":"N",
      "pushkey":"2427efdf1b62cd9dbdf174bbdff048f805146132"
   }
}
Muable-Content를 이용한 수신 확인 #
- 앱이 Background 또는 종료 상태일 경우에 Push Message가 mutable-content:1 타입으로 올 경우 Notification Service Extention에서 메시지를 우선 처리할 수 있다.
- iOS 10 이상 단말기에서만 사용 가능
Notification Service Extention #
1. File -> New -> Target 선택
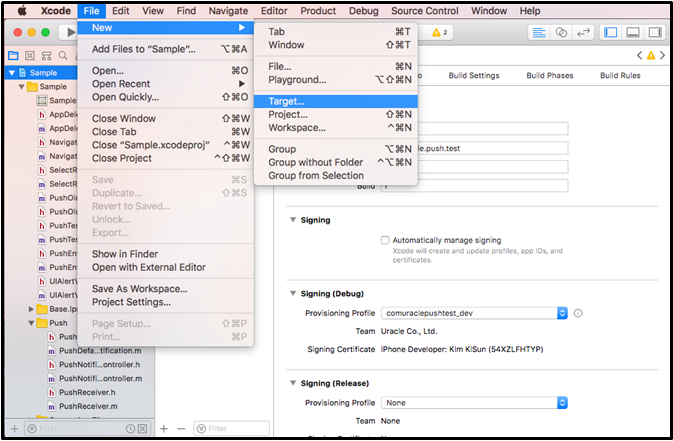
2. Notification Service Extention 선택
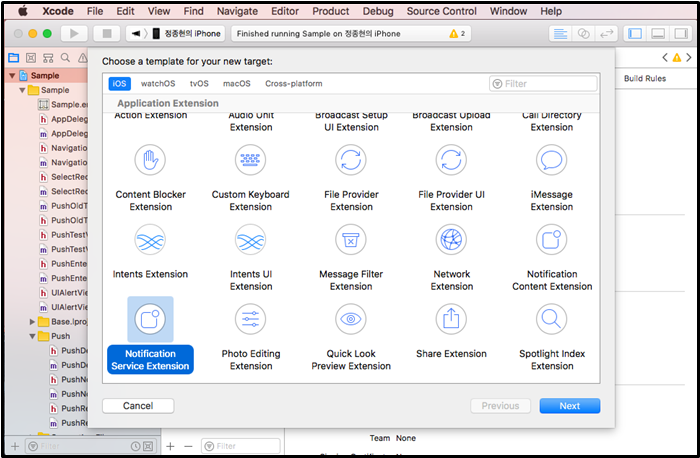
3. Product Name을 자유롭게 설정
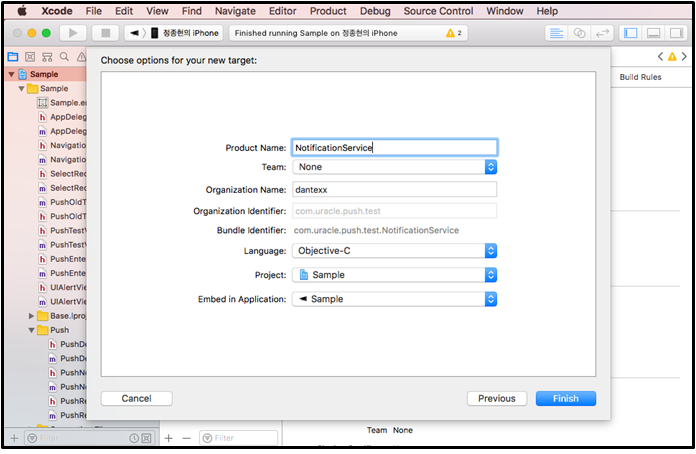
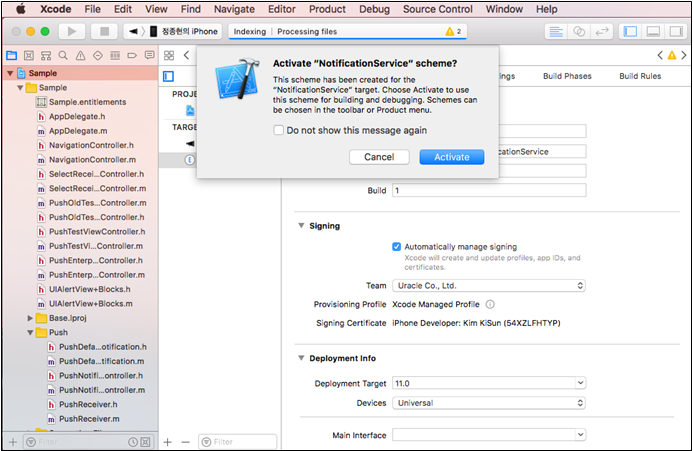
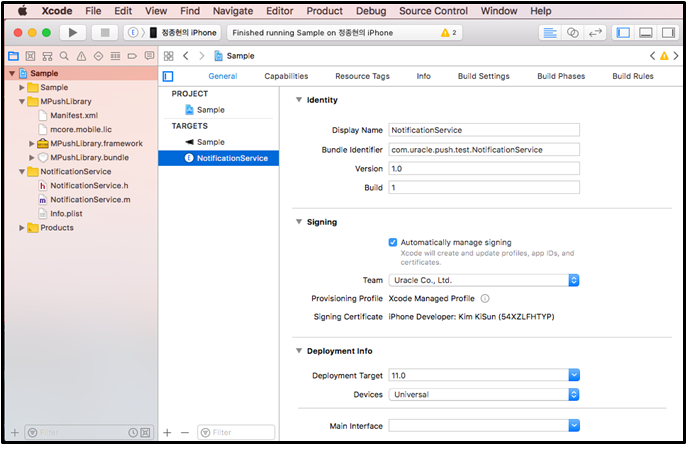
4. Activate를 선택하면 Notification Service Extention Target 항목이 추가
5. 추가된 NotificationService.m 파일에 Push 관련 처리
NotificationService.m 파일에서의 수신 확인 #
- Push 관련 라이브러리 파일들 Target Membership에 NotificationService 타켓 추가
- #import <MPushLibrary/MPushLibrary.h> 추가
- didReceiveNotificationRequest 메서드 내에 feedback 메서드 추가
// NotificationService 쪽에서 메시지 수신시 들어오는 이벤트
- (void)didReceiveNotificationRequest:(UNNotificationRequest *)request withContentHandler:(void (^)(UNNotificationContent * _Nonnull))contentHandler {
    self.contentHandler = contentHandler;
    self.bestAttemptContent = [request.content mutableCopy];

    //PushManager 초기화
    PushManager *manager = [PushManager defaultManager];

    //Keychain Sharing을 통해 feedback시 필요한 정보를 획득
    //키체인 공유 외에도 앱그룹등을 통한 방법으로도 공유가 가능 (app과 extension 사이에 데이터 공유)
    NSString *app_identifier = [NSString stringWithFormat:@"%@.pushDic", @"com.uracle.push.demo.NotificationService"];
    NSDictionary *pushDic = [KeychainController loadValueForKey:app_identifier forAccessGroup:@"com.uracle.push.demo.NotificationService"];

    //관련정보가 없을 경우에는 feedback처리 없이 완료
    if(pushDic == nil)
    {
        self.contentHandler(self.bestAttemptContent);
        return;
    }
    else
    {
        //데이터 공유시의 값의 정보 출처 샘플
        //[pushDic setObject:[PushManager defaultManager].info.clientUID forKey:@"cuid"];
        //[pushDic setObject:[PushManager defaultManager].info.pushServiceID forKey:@"psid"];
        //[pushDic setObject:[PushManager defaultManager].info.host forKey:@"host"];

        NSString *cuid = [pushDic objectForKey:@"cuid"];
        NSString *psid = [pushDic objectForKey:@"psid"];
        NSString *host = [pushDic objectForKey:@"host"];

        if(host)
        {
            //서버 호스트 정보를 셋팅
            [manager.info changeHost:host];
        }
        if(cuid && psid)
        {
            //feedback API 호출
            //push메시지 객체와 cuid, psid값이 필요
            [manager feedback:self notification:self.bestAttemptContent.userInfo clientUID:cuid psID:psid completionHandler:^(BOOL success) {
                //앱에서 중복으로 feedback처리를 하지 않도록 메시지 객체에 feedback 정보에 대한 값을 셋팅후 전달
                NSMutableDictionary *userInfo = [self.bestAttemptContent.userInfo mutableCopy];
                [userInfo setObject:@"true" forKey:@"feedback"];
                self.bestAttemptContent.userInfo = userInfo;

                self.contentHandler(self.bestAttemptContent);
            }];
        }
        else
        {
            self.contentHandler(self.bestAttemptContent);
        }
    }
}